LakeWinni User's Guide
Navigation Application for iPhone, iTouch and iPad.
Copyright 2011, Bradley K. Goodman
All Rights Reserved
Charts Copyright 2010, Bizer Corperation
All Rights Reserved
Contents
DisclaimerBasics
Using the Chart
Using the GPS
Navigation Panel
Main Toolbar
Display Toolbar
Waypoints
Routes
Sharing your Location
Info and Settings
Support
Disclaimer
LakeWinni is intended only as a supplemental, and secondary aide to navigation. The author of this program makes no claims as to the accuracy or reliability of the program. The author of the chart makes no claims as to the accuracy of the charts. In fact, we know these things are imperfect.
• Batteries die.
• Electronics don't like water. (Hint: you're in a boat).
• Programs have bugs.
• Lakes have uncharted rocks and features which change faster than charts do.
• GPSs and Compasses are subject to interference.
• People who write disclaimers forget to mention additional things which can go wrong.
This program is absolutely no substitute for local knowledge, the ability to properly and knowledgably navigate, proper seamanship, being acutely aware of ones surroundings, and relying on multiple sources of information (printed charts, compass, visual sightings, depth readings, landmarks, etc) as navigational aides.
There is a common term for the act of blindly relying on a GPS to do all this for you: "Death by GPS". (We're not kidding – Google it). This program is intended to make this information more accessible, easier to carry around, and integrated together (Chart, Compass, and GPS). It is not intended to replace your eyes, ears and brain.
User Interface Basics
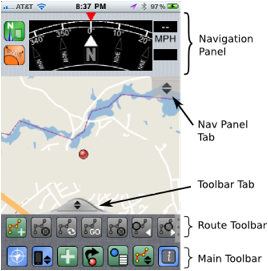
Figure 1 - Main Window Components
Figure 1 shows most of the components of the main window, expanded. Initially, the display looks simpler, revealing only the Navigational chart. The Toolbar tab, shown both in Figure 1 and in Figure 2 is used to expand and collapse the Main Toolbar in and out of view.
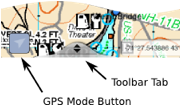
Figure 2 - Main Window with Toolbar Collapsed
The Nav Panel can be brought up by pressing the Nav Panel Tab – both of which are available when the GPS is on.
Note that the Chart an Navigation Panel will be displayed Side-By-Side, with the Navigation panel tab on the upper-right hand corner of the Chart Window when viewed in Landscape mode, as show in Figure 3.
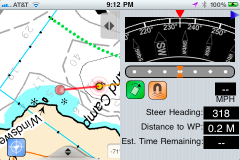
Figure 3 - Landscape View
Using the Chart
The chart can be dragged, zoomed and panned with typical iPad/iPod/iTouch swipe gestures. The chart is rendered in multiple zoom levels to provide maximum clarity at any size, and is saved within the application itself, allowing full viewing even when no Internet access is available.
Note that when places outside of the Lake Winnipesaukee are viewed, and your device has Internet connectivity, a normal street map will appear in the chart area. Also note that the area surrounding the usable area will appear as black before it transitions to the full map area. This is an artifact of the way the program compresses many levels of high-resolution charts into a small footprint on your device, eliminating storage needed by chart areas which are of no navigable use.
Using the GPS
NOTE - All options are not available on hardware. Most notably, GPS and SMS capabilities are not available on iTouch, or iPad devices without 3G support. We are, however, working to assure compatibility with a number of third-party add-on GPS devices, which give full-GPS support to iTouch, and non-3G iPad devices.
The GPS mode button always appears at the lower-left hand corner of the display, independent of the Main Toolbar visibility. The button appears in a way to always display the current GPS mode. Pressing the button will change the GPS mode as shown in Table 1. The GPS mode will both turn on/off the GPS, and change how the map is displayed.
Table 1 - GPS Mode Button
|
|
GPS is off |
|
|
GPS On - Red dot represents current GPS position. Red dot will move with movement, but map will stay in place. |
|
|
Map Centered – Map will automatically scroll with movement. Current position will remain in center of map. |
When the GPS is on, your current position is displayed with
a red dot: ![]()
To help visually identify your position, a blue circular outline will eminate (and fade away) from the red dot about once a second.
When running with poor, or degraded GPS coverage, a light blue, filled circle will surround the area around the red dot, indicating the estimated location. The center (red dot) represents the center of the area of probability (most probable area), but at best, one could only predict that they were somewhere in the blue circle.
This dot will stay centered on the screen when in "Map Centered" mode, and move on a stationary map when in "GPS On" mode.
When you are not in Map-Centered mode, the center of the map will be denoted with crosshairs, as shown in Figure 4:
![]()
Figure 4 – Crosshair Icon
The crosshairs are used to select/mark positions in operations such as Add Waypoint, Add Route Point and Send Position, as we will later discuss.
Note that Map Centered mode will automatically turn off of the map is manually scrolled by the user. Tapping the GPS Mode button will re-enable map centered more, scrolling the map to center the current location.
Also note that when the GPS is on, and the map is in "Relative Orientation" mode, the "center point" of the screen will often be shifted down toward the bottom of the screen. This gives you more of a view of the area on the chart in front of you, and less of what is behind you.
The Navigation Panel
When the GPS is on, the Navigation Panel Tab will appear at the top-right corner of the screen, and enable the user to expand/collapse the Navigation Panel (shown in Figure 1). The Navigation Panel is used when the GPS is enabled, and shows real-time orientation information.
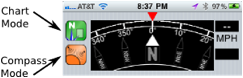
Figure 5 - Navigation Panel
Figure 5 details the Navigation panel. Most obvious are the compass and speed indicators. These display the current heading and speed, respectably.
The Compass mode indicator/button displays the current compass mode. You may press it to toggle the compass mode. Modes are shown in Table 2:
Table 2 - Compass Modes
|
|
GPS Mode – Orientation is determined by GPS. In this mode, multiple, subsequent GPS fixes are used to determine in which direction the user is moving. Accuracy in this mode depends on accuracy of the GPS, how fast you are moving, and how consistently you move in a single direction. Thus when standing still, moving slowly, or turning, orientation accuracy will suffer. When standing still it is virtually impossible to determine orientation. |
|
|
Magnetic Mode – Orientation is determined by the Magnetic Flux Compass sensors in the iPhone/iPad/iPod, if equipped. In this mode, the orientation will reflect which way your device is oriented towards, or pointing. The main advantage to this mode is that it works even when turning, moving slowly, or standing still. The main disadvantage is the accuracy of the device itself, as this is not particularly accurate, and is easily subjected to outside interference. |
Aside from the compass in the Navigation Panel, the orientation (determined depending on your "Compass Mode") can effect how the map is displayed, as determined by the "Map Mode", as detailed in Table 3:
Table 3 - Map Modes
|
|
North-Up - The map is always displayed in a north-up orientation. |
|
|
Orientation-Relative - The map is rotated, to display the current orientation. In this mode, the world as drawn on the map, should reflect the real-world around you. (Depending on the accuracy of the orientation). |
To get the full effect of these modes – try turning the GPS on, turning the Compass into "Magnetic Mode", and set the map to "Orientation Relative" mode – then watch the map and compass as you spin yourself (and the device) around.
The Main Toolbar
The main toolbar has several buttons on it used to access some LakeWinni's other features.
Table 4 - Main Toolbar
|
|
Expands/Collapses the "Display Toolbar" (See "Display Toolbar" below) |
|
|
Save Position – Saves a location at the center of the screen as a waypoint. This will be the your actual position if you are in "Map Centered" mode, or whatever place is located inside the crosshairs otherwise. |
|
|
Send Indicated Position – Send the location at the center of the screen, (inside the crosshairs) via Email, SMS, Twitter, or Facebook. (See "Waypoints" below). |
|
|
Send Current Position – Sends your current centered position via Email, SMS, Twitter, or Facebook. (See "Waypoints" below). |
|
|
Bring up the "Waypoint List" window. (See "Waypoints" below). |
|
|
Expand/Collapse the "Route Toolbar". (See "Routes" below). |
|
|
Show Information and Settings window. |
NOTE – Given the larger screen of the iPad, there is only a single toolpad which contains all the buttons. Therefore, buttons which bring up individual other keypads will not exist, and buttons which appear on the other toolbars, all will appear on the main (single) toolbar.
Display Toolbar
The display toolbar can be brought up by pressing the "Display Toolbar" button in the Main Toolbar, as shown in Table 4. It has two buttons, each of which has two states, as displayed in Table 5:
Table 5 - Display Mode Icons
|
|
Day mode – Normal display. (Press to change to "Night Mode"). |
|
|
Night mode – The display is dimmed and given a reddish tint, for optimal viewing, and to reduce eye fatigue in low-light conditions. (Press to return to "Day Mode"). |
|
|
Orientation Unlocked – Normal mode. User interface will change when device is rotated between landscape and portrait modes. (Press to lock) |
|
|
Orientation Lock – Display orientation will stay in the current state, and will not automatically change to adjust to the device orientation. Use this mode when/if your device is oriented in a way (often when laying flat) in which it tends to erroneously change display orientations in an unwanted manner. (Press to unlock). |
Waypoints
A "Waypoint" is a saved location. Waypoints may be used to remember a place where are currently are, or found manually by searching for it on the map. Waypoints are most notably used as a means to guide you back to a saved location.
Creating a Waypoint
Waypoints can be created by pressing the "Add Waypoint" button in the Main Toolbar:
![]()
The current centered location (which will always be your current position if in "Map Centered" mode, will be the location which is added. When depressing this button, you will be prompted with the "Add Waypoint" dialog, as show in Figure 6.
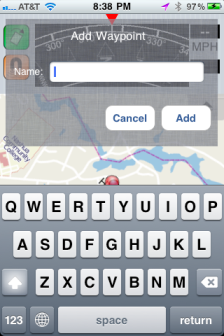
Figure 6 - Add Waypoint Dialog
Enter a name for this waypoint, and press "Add". A waypoint will be created with this name. Waypoints are show in the map with a blue pin, with the waypoint name underneath it, as shown in Figure 7.
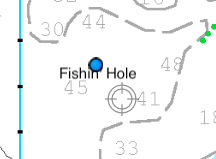
Figure 7 - Example Waypoint on Chart
Managing Waypoints
Saved waypoints can be brought up by opening the "Waypoint List" screen through the button on the Main Toolbar:
![]()
The waypoint list window will look similar to that show in Figure 8.
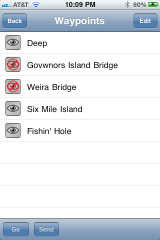
Figure 8 - Waypoint List Screen
As shown, there are 5 waypoints. By default, all stored waypoints will be visible on the chart. If you wish to declutter your chart display, you can hide the in the chart view by pressing the "eye" button on the left of each waypoint in the list screen, until a red circle with a slash covers the eye. Waypoints marked as such (Governor's Island Bridge" and "Weira Bride" in the example above), will not be shown. Tapping the eye button again on any of these will return their visibility.
Waypoints can be deleted, by tapping the "Edit" button on the list screen, then the red circle with a slash through it which appears to the left of the item you wish to delete, then tapping the "Delete" button. An example of which is shown in Figure 9.
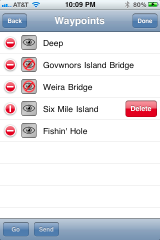
Figure 9 - Editing the Waypoint List
You can get out of Editing mode by pressing "Done". You can return to the main screen by pressing "Back".
Navigating to Waypoints
Saving away waypoints is good – but of not much use if you can't do anything with them! The most important thing you can do with a waypoint – is find your way back to it. To do this, in the Waypoint List, tap to select the waypoint you wish to navigate to (Note: Make sure you are out of "Edit" move above before trying this). Then press the "Go" button.
You will now be returned to the main screen, but you will not be in Navigation mode, as demonstrated in Figure 10.
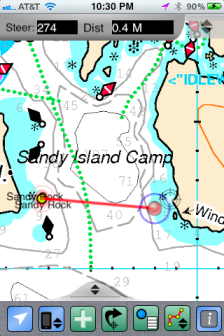
Figure 10 - Navigating to a Waypoint
As normal, our position is shown as a red dot. The waypoint we are in the process of navigating to, which is our current destination is known as the Active Waypoint. The active waypoint is shown in yellow, and has a red halo around it.
Cross-Track Error with the Red Line
Furthermore, a red line is drawn from our starting location (i.e. our current position) directly to our destination (the active waypoint). The red line will help us determine a direct course to the active waypoint – which is particularly helpful if the waypoint is very far away, and one or both waypoints may be offscreen. An example of this is shown in Figure 11. Here, for example our origin point is to the south of the bottom of the screen, and our designation is to the north of the top of the screen. The red line, which sits to the west of the red dot (our position) indicates that we are off-course, and too far to the east.
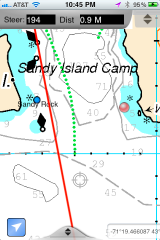
Figure 11 - Route with Offscreen Waypoints
Steer Heading and Distance
One important thing that should now be apparent in both Figure 11 and Figure 15, is the presence of a bar which lists both a "Steer" and "Dist" number. "Steer" represents the heading that the helm must steer to reach the waypoint from the current position (as opposed to your starting position), and "Dist" is the current distance to that waypoint. The units these are displayed in will be discussed later.
Waypoint navigation can be shut off, by pressing the "Stop Route" button in the "Route Toolbar".
The Navigation Panel
The Navigation panel comes in particularly handy when we are navigating to a waypoint. Bringing up the navigation panel now might display something as shown in Figure 15.
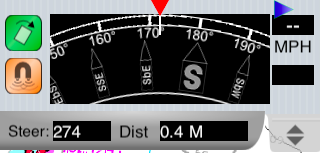
Figure 12 - Navigation Panel - Off Course
As shown in Figure 10, "Sandy Rock" is at a bearing of 274 from our current position. The magnetic compass in the Navigation Panel shows that our heading is currently 170. Without having to do a bunch of quick math to determine which way to steer to get there, the Navigation Panel easily tells us how to do this.
The red arrow in the Navigation Panel represents our current heading. In this case – it is about 172 degrees. The blue triangle is way to the right of it – and pointing right – and if you were looking at it – you would see that it is actually animating a gesture to really try to point you to the right. This is it's little way of saying you are heading off course, really off course, and you really want to steer to the right.
As you start steering to the right, eventually, you'll get no-so-off-course. The blue arrow will start swinging toward the red marker, as shown in Figure 13.
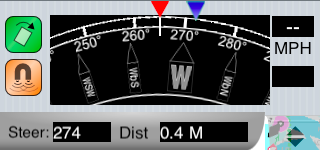
Figure 13 - Almost On-Course
As you get closer to being on-blue arrow will start to get closer to the red arrow. When you're directly on-course, the blue arrow will completely overshadow the red, as shown in Figure 14.
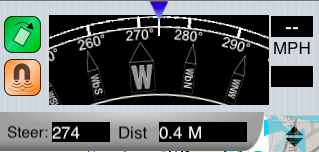
Figure 14 - On-Course
The basic rule of thumb is simple: Follow the blue arrow. If it's left, steer to the left. If it's right, steer to the right. The further away from the red marker, the further you need to steer.
Portrait Mode
In portrait mode, the Navigation Panel has a few more items it has room to display.
These are shown in Figure 15.

Figure 15 - Navigation Panel in Landscape Mode
Cross Track Error
Just below the compass, is a Cross-Track-Error indicator. If you're unfamiliar with the term, Cross-Track-Error can be described as illustrated in Figure 16.

Figure 16 - Cross Track Error
When you are travelling from a source point to a destination point, the shortest path is a straight line. More importantly, sometimes the path from A-to-B has been chosen to avoid obstacles or hazards such as submerged rocks, or to stay inside a channel. Thus, it is important to stay on the line from Start to End. The Cross-Track-Error (XTE) is your distance from the nearest (perpendicular) point of the line. In other words, how far off this course you are. Ideally, it should always be zero. In the open ocean, it doesn't matter too much, other than time and efficiency. In a narrow channel, it would be critical to keep this at a minimum.
Your Cross-Track-Error is displayed is displayed on the instrument shown in Figure 17.
![]()
Figure 17 - Cross-Track Error Instrument
When you are directly on the line between your start and end point, the orange indicator will be exactly centered on the middle diamond. The further to the left of the line you are, the further to the left the indicator will go. The further to the right of the line you are, the further to the right the indicator will go. Each mark on the indicator represents a cross-track error of approximately ¼ mile.
So the rule-of thumb to make corrections which keep you on the course-line would be to, steer the needle to keep it in the center. When the orange indicator is in the center, the blue arrow on your compass should be directly centered (over the red). This means you are steering an exact course to your destination, and are on the course-line. If the orange marker was over to the right, you would want the blue compass arrow to be pointing to the left of the red arrow. This means you are too far to the right, and steering a bit to the left of the end point, to correct the cross-track error.
Note that the definitions of "left" and "right" with respect to the Cross Track Error Indicator are in-reference to your "proper" orientation – as if you were standing at the "start" marker and directly facing the "end" marker. If you were to be steering so far off-course that your heading was perpendicular (or greater than 90 degress) to the course-line, the terms "left" and "right" would become erroneous. If you heading is too far off – (blue arrows are pointing like in Figure 12) – correct your heading before worrying about your Cross Track Error.
Estimating Time Remaining
Whereas an "ETA", or "Estimated Time of Arrival" is an absolute time as to when you are due to arrive at a waypoint (for example, 12:23 pm) – the "Estimated Time Remaining" (ETR) is expressed as a relative time – i.e. "Four minutes from now".
This is a simple factor of how far you are from the waypoint, and what your current speed is. So, changing your speed, or taking a course other than one that is direct from your current position to the destination waypoint – this result will vary.
If you are not moving (as shown above), or are moving very slowly, this becomes impossible to compute, as you will never arrive – and will therefore show no time estimate.
Routes
Knowing where a point is isn't always sufficient to get you there. Often (especially in Winnipesaukee) to get from point A to point B, one has to go around islands, navigate channels, etc. You cannot just follow a straight line from A to B.
I also created this (not-so-great) video, demonstrating the creation of a route. See it here.
About Routes
Routes are similar to waypoints – although rather than simply following a route to a single waypoint – one follows a path along a series of route points, which illustrate a path from A to B. Whereas waypoints are known by name, routes themselves are known by name, but the individual points in a route, (called a Route Point), are each designated by number.
When a route is created (or loaded), and the user presses "Go", a navigation point (similar to that of a Waypoint) is created from the user's current position, to Route Point #1. Route points are denoted with a yellow pin, with an orange line connecting them, representing the path to be followed. This is shown in Figure 18.
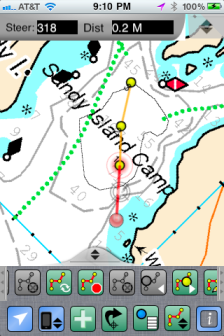
Figure 18 - Example Active Route
Several things here are the same is with Route Points. Notably, the red line indicating the current path to be followed, and the orange halo around the point which is the current destination. This will start with the path from the location at which the route was started to Route Point #1. Upon arriving at a waypoint, the program will give an audible alert tone, and the active route point will automatically advance, setting the destination to the next point in the route. Route navigation will stop once the last point has been reached.
As it is rare that a user will exactly reach a specific waypoint. For example, users may (intentionally or unintentionally) "round" markers or waypoints – or GPS accuracy may not specify that a waypoint was exactly reached. A special algorithm is used to try to infer when a user has reached, and/or passed a waypoint, and is now heading to the next. If at times, the user were to take a gigantic shortcut, bypassing a waypoint completely, it may be necessary for the user to manually hit the button to advance to the next waypoint. Until doing so, the program will continue to attempt to guide you back to the previous waypoint. Thus, it is always important to play close attention to what the program is telling you what to do, to make sure that it is indeed correct.
Route Buttons
All the buttons to work with routes are in the Route Toolbar, which can be viewed by pressing the "Expand/Collapse Route Toolbar" button, as shown in Table 4, which looks as follows:
![]()
The Route Toolbar, shown in Figure 19, contains so many buttons, that they will not all fit on the screen on smaller devices (like the iPhone or iTouch) when in portrait mode. Therefore, the Route Toolbar can be scrolled to the left and right, with a swipe of the finger.

Figure 19 - Route Toolbar
Buttons on the Route Toolbar are as follows:
|
|
Show list of saved routes |
|
|
Reverse the direction of the current active route. Used if you have a route which goes from "A"-to-"B" – but you actually want to go from "B"-to-"A". You can just load an A-to-B route, then reverse it, as opposed to creating and saving two different routes. |
|
|
"Back to Previous Waypoint" - Make the previous route point active. |
|
|
"Advance to Next Waypoint" - Make the next route point active. |
|
|
Delete the last route point in the route. (Think of it as an "undo" when adding points into a route). |
|
|
Start the current route. This will make the first route point in the route the "active" route point, initiating navigation to it. |
|
|
Stop navigation along the current route. |
|
|
Add a new route point, using the position in the center of the screen (in the crosshairs), as the point to add. |
|
|
Clear the current route. |
Sharing your Location
There are three different ways of sending locations to other people or devices.
Existing Waypoint
The first way involves sending an existing waypoint. This can be done by opening the Waypoint screen (shown in Figure 8), selecting the waypoint from the list, and then tapping the "send" button at the bottom of the screen.
Current Location
Another way permits you to send your current location. This can be done when the GPS is on, and the map is in "Map Centered" mode. When this is true, the "Send Current Position" button will be displayed on the toolbar as such:
![]()
clicking on it will allow the user to send the current position.
Map Location
When the GPS is not on, or the map is not showing the actual current physical location, you can send any position on the map by placing the location in the center crosshairs of the map view, the selecting the "Sent Selected Location" button, which will appear in the Main Toolbar as such:
![]()
Methods of Sending
Regardless of which kind of method was used to send the position, when you have selected to send one, you will be given an alert which will give you several different options for how or to where you would like the position sent:
Email – An email message will be started, placing a URL to a Google Maps page showing your location in the message body. You may enter one or more message recipients, a subject, and whatever other body text you wish in the message before sending it. Note that you must have WiFi or 3D data access to actually send the message. As this function uses the standard Mail application on the phone, if network access is not available, the message will remain in your "Outbox" until sufficient network access is available to send it.
SMS (Google Maps) – This will place a URL to a Google Maps page in an SMS message, which you can send to other user. Note that you must have 3G access for the SMS message to be sent. Once sent, a user will receive a URL which they can click on, and view your location on a Google map on their device, if their handset supports web browsing as such.
Twitter, Facebook – APIs exist which will allow you to post your location directly to Twitter or Facebook, right from the application itself.
SMS – Send an SMS message with your position to another user of LakeWinni, which they can pull right into their program. Doing this will start an SMS message with a special URL, which when received and clicked on by a user on another device running LakeWinni, will allow them to save your waypoint, or start navigating directly to your position. Figure 20 shows an example of a received SMS message sent by the program:
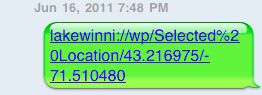
Figure 20 - SMS Message Example
When a user who has LakeWinni on their device clicks this URL, it will Launch the LakeWinni program, prompting them with an alert, asking what they wish to do with this location, as shown in Figure 21.
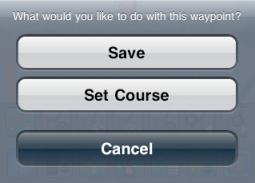
Figure 21 - Receiving an SMS URL
If the user selects "Save", this waypoint will be saved to their waypoint list. If they click "Set Course", the program will enter Navigation mode, setting this point as the destination, just as if they were navigating to a waypoint, (the difference being, the position is not actually saved).
Information and Settings Screen
Figure 22 shows the Information and Settings window. One can configure several of the ways in which the program works from here.
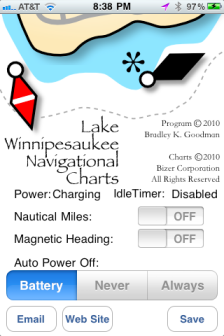
Figure 22 - Information and Settings Window
Parameters are as follows:
Nautical Miles – Setting this to "On" will make the program display distances in nautical miles, and speeds in knots. Setting this to "Off", will display distances in statued miles, and speed in (statued) Miles per Hour.
Magnetic Heading – Setting this to "Off" will display "true" headings. Setting this to "On" will display "magnetic" headings. Note when this mode is on, magnetic variation is fixed to represent Lake Winnipesaukee. i.e. if this program is used away from Lake Winnipesaukee, the magnetic headings will be erroneous, as they will be calculated against improper magnetic variations.
Auto Power Off
The iPhone/iPad/iPod, by default, will typically power off automatically after a period of time if it does not receive any user input. This is often undesired during long periods of navigation, during which a user wishes for the program to keep functioning, though it is not actually touching or interacting with the unit. On the other hand, leaving it in this mode is one sure-fire way to drain your battery very quickly.
Thus three different modes exist to regulate this:
• Battery – The device will automatically power off if it is run by batter power – (i.e. not connected to any external power supply).
• Never – Device will never power off when LakeWinni is running
• Always – Device will power off after normal system-defined inactivity period. (See settings in devices "Settings" application).
Note that it is strongly advised to run your device off of external power when being used for navigation. There are many inexpensive charging cables for iPhones/iTouches/iPads which can be purchased on eBay, which will run well off of a boat's 12v power system (through a cigarette lighter adapter socket, etc). Many of these are integrated into mounts you can use to hold your device by the helm as well.
There are also buttons at the bottom to let you email support, or jump to the support/documentation web site.
